Hi Everybody, Having fun in the All-American Blog Hop so far???
Hopefully you just came from visiting the VERY talented Lola at http://www.purplepeepstechniques.blogspot.com/. If not, please head over to see Jenny at http://www.crazyaboutcricut.blogspot.com to start from the beginning.
Thank you for joining us for the All American Blog hop! We are sharing projects that celebrate anything American! So anything like BBQ's, family picnics, 4th of July, or more. Here's my contribution to the bloghop!
My Amazing husband:
This is my hubs with our youngest son, Nathan. He's a great dad, a great man, an excellent husband, and my hero. You see, Charlie is a soldier. He has devoted 14 years of his life to Active Duty Army and has been on 2 tours to Iraq and Afghanistan. The man doesn't call himself a hero, but he really is one. He loves America. No, really, he L-O-V-E-S America! For Charlie, being a soldier is “just another day at the office”. For me, it’s a swelling of pride as my husband dons his uniform.
I can't think of anything more "All American" than my husband who serves our country, so I decided to make my bloghop blog all about him today! I am so blessed to serve him as he serves y'all. -that's southern for you guys.
Now, I made this scrapbook album for a few reasons.
1- This is the All-American bloghop! What is more All American than a US Soldier?
2- My husband is soon to be an Army Recruiter and he needs this scrapbook for his job.
3- I want to document his military life, even though he just considers it “work”.
I am just posting pictures here, but I will go more into detail in a later blog to describe how I did this. Feel free to leave a comment and ask any questions- I’ll answer every one of them, I promise. Oh, wait- I will explain how I did the cover because it’s so stinking cool! I took one of his blouses (yes, that’s what they’re called!) that didn’t work anymore and cut it up to cover the inside cardboard which I doubled to give extra stability. I cut the pocket out and used fabric glue to adhere it to the front. The name tape is his actual name tape on his uniform and the army emblem on the front is a metal sticker that was from the CUTEST little scrapbook shop in Dover, TN. (shout out to my girls a Precious Scraps!) If you are ever in the Ft. Campbell, KY area, or Dover, TN, or Paris, TN or anywhere near us, you NEED to come see Beverly at Precious Scraps- she will hook you up! (and no, I’m NOT getting paid for that, I just love her store, she’s always been good to me!)
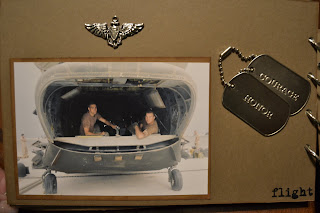
Well, this is my scrapbook: I will say I used paper from everywhere. I don’t know specifically where I got each piece. I just used colors that blended together, complimented each other and some that look like leather. (Look at the giant Chinook, it has texture; don’t know if you can see it from the photos) I mainly used my ATG gun for the adhesive. And the stickers are from hobby lobby. (for the most part) I got the dog tags from Archivers in Gurnee, IL (when I lived in North Chicago; I miss that store!) and for the cuts, I used my Cricut and the Stand and Salute cartridge.
There are a couple of GREAT prizes to win today! You can win a Scrap 'n Tote!! You can also enter to win this AWESOME prize pack from Post-it!
To enter to win the prizes:
1. You must leave a comment on all of the blogs in the hop.
2. Please be a follower of Crazy About Cricut.
That's it! Winners will be announced July 7th! Thank you, now please head over to see Leah at http://www.leahscarddesigns.com
Here is the lineup in case you get lost or need to stop along the way:
Jenny @ http://www.crazyaboutcricut.blogspot.com
Cheryl @ http://www.cardsbycg.blogspot.com
Sharon @ http://www.simplysweetbysharon.blogspot.com
Tanya @ http://www.scrappinkymomma.blogspot.com
Bobbi @ http://www.rockgirlcustomdesigns.blogspot.com
Angie@ http://www.sitrestdownplay.blogspot.com
Paula @ http://www.owlbescrappin.com
Jen @ http://www.mccalleyhouse.blogspot.com/
Sandra @ http://www.sweetpeascards.blogspot.com/
Lola @ http://www.purplepeepstechniques.blogspot.com/
You are Here:http://www.paper-junkie.blogspot.com/
Leah@ http://www.leahscarddesigns.com
Amber@ http://my3escrapbooking.blogspot.com


